September 30, 2012

Chocolate Buttermilk Pound Cake

Wow. Yesterday was QUITE the day!! Stephen let me sleep in, like the angelic husband that he is, then we whisked ourselves promptly off to the downtown farmer's market. Again, wow!! The number of fabulous looking vendors!! There were so many things I wanted to try... had to be strong... but I couldn't resist handmade pierogies that were melt-in-your-mouth delicious, and the BEST gyro I have EVER had!! I know where I'm getting my lunch every Saturday till the end of October!! I'll take more pictures next week for you. :)

Then I came back, strapped on the apron, and set to work making 2 full meals, complete with desserts. Last Sunday I accidentally signed up to feed the missionaries and take a meal to an elderly woman on the same day! Not knowing anyone, I couldn't think of any way to trade, so I just went with it. Two soups, two breads, two desserts!! And finally, a truly scrumptious chocolate cake for my hubby and all you chocolate-lovers out there! Yes, I know, I'm strange. 

But oh, it feels so GOOD to feed missionaries again!!!

Chocolate Buttermilk Pound Cake (adapted slightly from Passionate About Baking)
Printable Recipe

1 cup plain flour
1/4 cup whole wheat flour
1/2 tsp baking powder
heaping 1/4 cup cocoa powder
1/4 tsp baking soda
1/4 tsp salt
1/2 cup (1 stick) unsalted butter, room temperature
1 cup granulated sugar
2 eggs, room temperature
100ml buttermilk (use a glass measuring cup with ml)
2 tsp pure vanilla extract

Grease and flour the sides of a 8 inch springform or straight-sided round cake pan. Line bottom with parchment, and butter and flour parchment.
Preheat the oven to 325 degrees.
Sift together the flour with the cocoa, baking powder, baking soda and salt. Set aside.
Cream the butter and sugar until fluffy. Beat in eggs one at a time, then the vanilla.
With beater on low, add the flour and buttermilk alternately in three lots (flour, buttermilk, flour, buttermilk, flour)
Bake for 45-50 minutes till top is springy, and toothpick inserted in the center comes out with a few crumbs. I suggest checking after 35 minutes, you do NOT want to overbake this cake!

Meanwhile, make the glaze…

100gms (3.5 oz) dark chocolate (I used Dove chocolate
3 tbsps cream

Gently simmer the cream and chocolate over low heat, stirring constantly until the chocolate just melts. Take off heat and stir briskly till nice and shiny. The glaze should be nice and thick, yet of flowing consistency. Add a little cream if the glaze is too thick, or a little chocolate if it is too thin. It will continue to thicken as it cools down.

Finishing off…
Overturn the cake out gently on rack, and remove the lining. Turn it back on another rack. Let it cool for about 15-20 minutes. Pour the glaze evenly over the hot cake, coaxing it all around, letting some drip over the sides. I served mine with homemade whipped cream.
Isn't ganache a gorgeous concoction?? It doesn't even matter that I was in a hurry. It still looks glossy, decadent, and delectable.
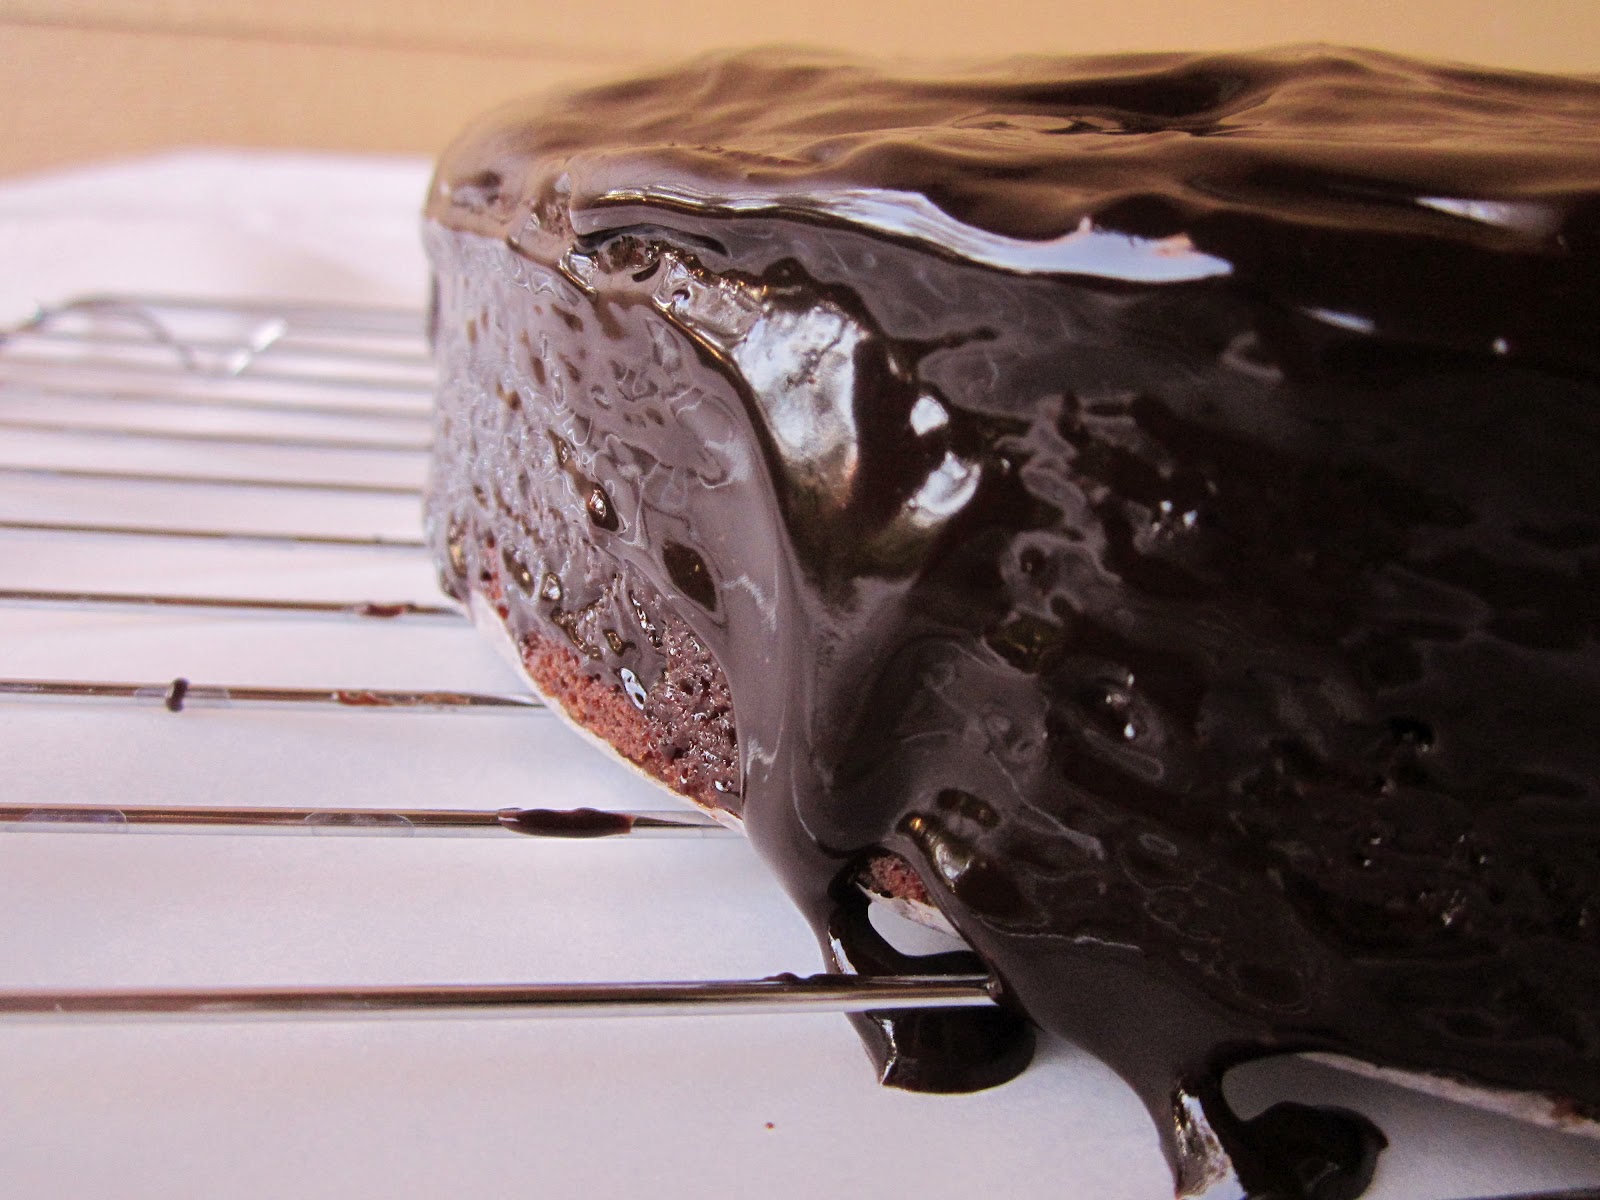
I have to admit, I over-baked mine a bit. Still learning the quirks of my VERY hot oven! But I promise, it was still scrumptious!
The flavor was deep, dark, and everything chocolate cake should be. Keep an eye on it, pull it out when it has more of a brownie-like texture, and you will melt for it!

Chocolate, delivered. 

Please join my Nibbles and Novels party tomorrow! It goes live at 10:00 tonight, for my friends on the other side of the ocean.  :)

September 29, 2012

Stay Tuned...

HI! I am dashing off a quick post between soup and ganache. I've been cooking ALL DAY!! Rackin' up some awesome recipes for you peoples. While I apologize for the lack of recipe today, I promise you CHOCOLATE tomorrow!

PS- Day after tomorrow is my Nibbles and Novels party! Please come play!! :)

Source: tastebuds on Pinterest

September 28, 2012

Almond Poppyseed Loaf

My dear friend Cherie (Cherie of the Fabulous Carrot Cake) asked me a question a few days ago: "Do I have to put lemon in EVERYTHING to be part of your club??" LOL!!

Point taken, Cherie! I am a bit of a lemon addict, aren't I? I guess I'm just getting it all out of my system, before the days of spices, pumpkin, apples, and chocolate move in permanently. Well, this one is for Cherie, and any other not-so-much-lemon fans out there! I hope you like it! It's great for delivering to new neighbors... :)

Almond Poppyseed Loaf
Printable Recipe

3 cups flour
1/2 tsp salt
1 1/2 tsp baking powder
2 cups granulated sugar
1/4 cup brown sugar
1 Tb poppy seeds
1 1/2 cups milk
3 eggs, room temperature
1 1/8 cups cooking oil (vegetable, sunflower, etc)
2 tsp almond extract
1 tsp vanilla
2 Tb melted butter

Glaze:
1 cup powdered sugar
2 Tb butter, melted
1/8 cup half & half (you can also use milk)
1/2 tsp vanilla
1/2 tsp almond

Preheat oven to 350 degrees (340 if you are using dark metal pans). Grease and/ or line 2 loaf pans with parchment paper. Stir together flour, salt, baking powder, poppy seeds, and sugar, until well mixed. Add all the other ingredients, and mix well. Pour into loaf pans. Bake 50-60 minutes, checking often (without opening the  door if you can!) after 45 minutes, to make sure they aren't overdone. Check with a toothpick inserted in the middle. Clean toothpick = done! Let cool in the pans just a few minutes

Combine all glaze ingredients in a small saucepan. Stir on medium heat until sugar is dissolved and it gets light and bubbly. Remove bread from pans, place on wire rack over a sheet of waxed paper and pour glaze over warm bread. Use spoon or spatula to bring the glaze that has run off up and over the warm bread until it stays on. Optional: Sprinkle with sliced almonds. Do this quick, before the glaze sets!!
I only topped one with almonds... because I forgot the almonds till after the glaze had set... so I scooped up the extra glaze that had dripped off, re-heated it, re-drizzled it, applied almonds, and had a little more to drizzle over the top of those. Whew! Worth it though, don't you think? Pretty!
Fabulous creamy almond flavor, light... uh... poppy seed flavor? I like them, but I can't really describe them. Anyone?? What do poppy seeds actually taste like??
Ah well. It's scrumptious, and about as classy and elegant as loaf cake gets! Perfectly moist, NOT heavy, it rose all pretty...
The little bit of brown sugar deepens the flavor a tad, but that GLAZE is my favoritest part! I'm going to have to put it on other things... cookies, muffins... toast.

Easy as pie, and SO yummy!! Try the bread, read a book or three, and come back on Monday!!

Shared on Foodie Friends Friday

September 27, 2012

Ginger Chocolate Chip Scones

Scones, scones, wonderful scones. Tell me, when you think of British Food, what's the first thing that comes to mind?? For me, it is always either crumpets or scones. (I don't know how to make crumpets... yet) Maybe that's why scones have been one of my favorite goodies for as long as I can remember. Maybe it's their semi-biscuity texture and light sweetness. Who knows, but I adore them, and always will. Now, I know I made scones just a little while ago, and I was going to save this variation longer... but it's just too yuumy to keep hidden away as a backup. Besides, it has CHOCOLATE!! By the way, I am making a concerted effort, for my readers and my chocoholic husband, to find more deep, dark, delicious chocolatey recipes. Try this one for starters, even if it is just a version of the Ginger Berry Scones.

They're addicting. Really.

Ginger Chocolate Chip Scones (adapted from The English Kitchen)
Printable Recipe

3 cups flour
1/2 cup caster/ultrafine sugar
1/4 cup powdered milk
3/4 tsp salt
1 Tb baking powder
1 tsp cinnamon
1/2 tsp each of ground allspice and ground ginger
1 cup of semi-sweet chocolate chips
a little bit less than 1/4 cup candied ginger, minced
2 large eggs, beaten
2 tsp vanilla
1/2 cup buttermilk
8 Tb cold butter, cut into about tablespoon-sized chunks
1 egg, beaten with1/2 tsp water and 1/2 tsp vanilla (for glazing)
Preheat the oven to 450 degrees. Line a large baking sheet with parchment paper. Set aside.
Whisk together all the dry ingredients in a large bowl. Cut the butter in (or rub in with your fingers, pulse in food processor, etc) until butter bits are no larger than small peas. Stir in the chocolate chips and ginger. 
Whisk the eggs, vanilla, and buttermilk together in a separate bowl.
 Add the liquid ingredients to the dry ingredients, mixing in with a fork and being careful not to overmix. Gently fold together until all loose flour is mixed in.

"Turn the dough out onto a lightly floured surface and knead a few times. Divide the dough in half. Place both halves onto the prepared baking tray and pat each half into a 7 inch circle, approximately 1/2 inch thick, leaving at least 4 inches between each round. Cut each round into 8 wedges, separating them only very slightly. Brush the tops with the beaten egg/water combination and sprinkle with some coarse sugar or cinnamon sugar, if using."

Place on the middle rack of your preheated oven. Bake for 7 minutes only. Turn the oven off and allow them to sit in the oven for a further 8 to 12 minutes without opening the oven door. They should be golden brown. Remove from the oven at the end of that time and place on a wire rack to cool slightly before cutting apart and eating.
My Mom made a funny face at me when I said "ginger and chocolate." Really?? I thought it was a classic combo!
These were sooo good. I think I ate half of them myself... Over multiple breakfasts... and snacks...
Ginger and chocolate, a match made in chocoholic (and non-chocoholic) heaven.
I saw a recipe for chocolate gingerbread on Pinterest... yes, believe I must. 

September 26, 2012

Cheese and Herb Buttermilk Bread

I think I can say with confidence that Fall is FINALLY here!! Yesterday was gloriously drizzly, the trees are officially turning gold around the tips and edges, and there is a crispness to the air, even after it warms up!

AND, I put my favorite long-sleeved shirt on today! I feel cozy and pretty. Tis a good day. A good day to make this savory, homey, delicious, yet-another-buttermilk-recipe for Bread! There are a few more buttermilk recipes coming up... I just might convince you of its genius, and you may learn why you should ALWAYS have buttermilk on hand!

Happy First Day of Feeling-Like-Fall!


Cheese and Herb Buttermilk Bread (adapted from Sugar Spice and Everything Nice via Pinterest)
Printable Recipe

2 1/4 cups plain flour
2 tsp baking powder
1/2 tsp bicarbonate of soda/baking soda
1 tsp salt
1/2 tsp dry mustard powder
60g freshly grated parmesan (2/3 cup packed)
60g grated cheddar cheese  (2/3 cup packed)
1 tsp salt
1 tsp freshly ground black pepper
2 tsp thyme leaves or 1 tsp dried thyme
2 eggs
2 1/2 Tbsp olive oil
1 1/4 cup buttermilk
Egg wash (optional) made from 1 egg yolk beaten with 2 tsp water

Extra thyme springs and sea salt, for topping

Ingredients she had that I skipped:
1/2 cup green olives, sliced
8 pieces sundried tomatoes, sliced thinly
1/4 cup mixture of spring onion and Italian parsley 

Preheat oven to 180C or 350F. Butter and flour/ line with parchment and butter one loaf pan. Set aside.

Whisk flour, baking powder, soda, salt, pepper and mustard powder into a large bowl. Add both cheeses and thyme and stir them together.

In a separate bowl, whisk the eggs, then whisk in the oil and buttermilk until well combined.

Make a well in the center of the flour mixture and pour in the wet ingredients. Stir together to form a thick, sticky batter. Pour into loaf pan and spread evenly. Brush the top with egg was and sprinkle thyme and sea salt on the top. (Careful with the sea salt!)

Bake for 40 -50 minutes or until a toothpick inserted in the center comes out clean. Let cool in pan for 5 minutes, the remove and cool on a wired rack. Serve warm.

"This loaf is best served on the same day. Wrap left overs tighly and store in fridge. Gently reheat in oven if serving left overs"
I left out all those neato things trying to please my family. While it turned out VERY yummy, I would recommend adding in the sundried tomatoes at least. I think I'll add spring onions next time too. It just needed a bit "more", somehow. But if you are not a fan of all of those, you'll probably love it!!
Somehow she got her outside thyme to not dry up... Oh well! Isn't it a gorgeous loaf?? Those little pockets of cheese, the sweet sharpness of GOOD parmesan, that fabulous moist crumb from buttermilk, savory herbs...
We had this with Chicken Pot Pie last night, they went together wonderfully. I don't think I have ever made a savory bread before! Biscuits, yes, but not bread! This is satisfying, easy, and yummy. It would be fabulous with some soup!
See? It's just asking to be made!

September 25, 2012

Raspberry Cheesecake Shortbread Bars

I couldn't leave you without a recipe, but please take a peek at my earlier-today post!!
And these are totally scrumptious. I brought them to my first playgroup here. Hooray for a new place to take treats, away from me and my shaky self-control! And new friends, of course. :)


Raspberry Cheesecake Shortbread Bars (adapted from Better Homes and Gardens)
Printable Recipe

1 cup unsalted butter (2 sticks) cut into 1-inch chunks
1/4 cup packed light brown sugar
1/2 tsp salt
2 cups all-purpose flour

Softened butter (for brushing sides of foil)
1 cup jam or preserves (I used peach) with 1 tsp fresh lemon juice mixed in
1 pint (2 cups) fresh raspberries
8 oz package cream cheese, softened
1/2 cup granulated sugar
1 Tb all-purpose flour
1 large egg plus 1 yolk
Zest from 1 lemon
2 tsp freshly squeezed lemon juice
1 tsp vanilla

Preheat oven to 350 degrees. Line a 9x13-inch baking pan with a sheet of aluminum foil, leaving extra foil extending over ends (use these later to lift bars from pan); set aside. 

In a large bowl beat the butter with an electric mixer on medium to high speed until it just begins to blend and soften slightly, about 30 seconds.

Add brown sugar and salt, beat on low speed just until it's mixed in, 30 seconds to 1 minute. With mixer off, add the 2 cups flour. Beat on low speed until flour is incorporated. Increase speed to medium, mix until ingredients lump together in a smooth dough. Don't worry about over-mixing.
Break dough into small chunks and distribute in prepared pan; with your fingers press dough into an even layer. 

Bake 20 minutes or until dough has begun to puff and edges are golden. Cool on wire rack 5 minutes.

Lightly brush exposed sides of foil with softened butter to keep filling from sticking. Spread jam evenly over crust. Sprinkle evenly with raspberries.

In a large bowl beat cream cheese with an electric mixer on medium to high speed for 30 seconds. Mix in granulated sugar and 1 tablespoon flour until blended. With mixer running, add egg, egg yolk, lemon zest, lemon juice, and vanilla. Beat until smooth.

Pour cream cheese filling evenly over the berries. Bake for 25 to 30 minutes, or until it is barely jiggly in the middle. Cool completely on a wire rack, then refrigerate and chill for at least 2 hours.

Use foil to lift the bars from pan. With a knife for help if necessary, gently peel the foil down from sides of the bars.

Cut into long bars, peel foil from bottom, and transfer to cutting board to cut into squares.
So, I waited too long to make mine, most of my berries molded... so I put the survivors on top, but I think they would be much yummier under the blanket of cheesecake, becoming one with the jam...
...the jam which I was worried would disappear into the filling... But it didn't!! You could make this recipe with any berry/jam combination you can dream of! Don't forget the lemon juice though, it cuts through the sweetness of most store-bought jams. 
Some might think there is a rather unbalanced crust-to-filling ratio here, but I loved it. The crust is a fabulous buttery toothsome shortbread, and I love all things Scottish, and isn't shortbread originally Scottish?? I could be wrong... but that might shake the foundations of my cookie world... The creamy cheesecake and tangy fruits complement it wonderfully. This was easy, pretty, and delicious, and I will definitely make it again!

I should really start eating real food for breakfast again one of these days...

Nibbles and Novels

I believe I have mentioned that I am a bookworm. I have been guilty of neglecting my duties while in the crucial chapters of a riveting novel. I have shown my tiny old book collection, and often quoted/referred to my favorite literary characters. But this is a food blog, right? At least, that is its main goal. I've been racking my brain since discussing a blogging book club with Becky at Beauty for Ashes (which I still intend to try!) for a way to combine food and books. And I've finally got it! I am taking a deep breath, and diving into the deep end...


I'm going to host a link party!! I will need to be coached (Shaylee!! Help!!) and I must admit I am very nervous. Most of my blogging idols never host link parties... and I want to be just like them... but I need to venture out on my own, right?? I think so. And I hope a few of you think this sounds like fun...

Here's the idea: I'm going to host a monthly "Nibbles and Novels" party! The rules are: you must link a post about a book, OR a recipe from/inspired by a book! Cookbooks don't count, but books with recipes do, (like those mystery series full of recipes that keep popping up all over the place) You must tell me (us!) about your inspiration. Fiction or nonfiction, doesn't matter! We'll start October 1st, and continue the first of every month. What do you think?? Could this work?? I'm cautiously excited!! If you have any questions, or ideas, please send me a comment, I promise to reply! I do SO hope a few of you will join, it could be so much FUN!!
Source: stylemepretty.com via April on Pinterest

I will leave you with a bit of inspiration from Anne Shirley (my literary idol!)

"You should just see our pantry. It's a sight to behold...We're going to have two kinds of jelly, red and yellow, and whipped cream and lemon pie, and cherry pie, and three kinds of cookies, and fruitcake, and Marilla's famous yellow plum preserves that she keeps especially for ministers, and pound cake and layer cake, and biscuits as aforesaid; and new bread and old both..." ~Anne of Green Gables

September 24, 2012

Brown Sugar Pound Cake

Brown sugar is the gypsy of the baking world. Granulated sugar is everywhere, in everything. White, sweet, simple, boring. Don't get me wrong, it's great stuff. I use it all the time. But by itself? Eh. Switch half of it out for brown, and you get chewier, richer cookies, crisper crusts on loaf cakes. And who uses anything other than brown sugar on oatmeal??

Brown sugar says decadence. Brown sugar says deep, rich flavors. Brown sugar makes caramel. It dances on bare feet in a red skirt, making eyes at your husband. It gets very few recipes all to itself, but when it does? Watch out.

Okay, so you might chuckle at my imagery, but I like it. It popped into my head and begged to be written. Just like this cake popped up on Pinterest and begged to be made. And just like the classic gypsy mystique, it will keep you guessing... in this case, wondering, "Was it really that good?? I think I need another bite..."

Yes. It is really that good.

Brown Sugar Pound Cake (adapted from Dana Treat via Pinterest)
Printable Recipe

3 cups all-purpose flour
1 tsp. baking powder
½ tsp. salt
1½ cups (3 sticks) unsalted butter, at room temperature
3 cups firmly packed light brown sugar
5 large eggs, at room temperature
1 cup whole milk (Mine didn't rise much, I think I would try yogurt instead next time)
2 tsp. vanilla
Preheat oven to 325ºF. Butter and flour two 8×4-inch loaf pans, knocking out excess flour. (Or grease and line with parchment paper!)  Mix the flour, baking powder, and salt together in a bowl. Set aside.
Beat the butter in the bowl of an electric mixer on medium speed for 3 minutes, until fluffy. Slowly add the sugar (I measured it into a bowl, then spooned it into the mixer) and beat for another 3 minutes, increasing the speed to medium-high. The mixture should look very light and fluffy. Add the eggs one at a time, beat well after each one. Scrape down the sides of the bowl and beat again.

Combine the milk and vanilla. Slowly add a third of the flour, then half of the milk. Repeat with another third of flour, and rest of milk. Gently fold in the last third of flour by hand.
Turn the batter into the prepared pans.
 Bake for 1 to 1½ hours, checking after 55 minutes and every 5 to 10 minutes thereafter, until a toothpick inserted near the center of the cake comes out with just moist crumbs attached. (I should have baked mine a hair longer!) If the cake is very brown after 55 minutes but not yet fully baked, cover the top with a sheet of aluminum foil. When done, the cake will be springy to the touch and pulling away from the sides of the pan. Let cool in the pan for 10 minutes, then turn out onto a wire rack to cool completely before glazing.

Brown Sugar Glaze (for 2 cakes)

½ cup (1 stick) unsalted butter
½ cup firmly packed light brown sugar
¼ cup heavy cream
¼ tsp. salt
2 tsp. vanilla
1/4-1/2 cup confectioners’ (powdered) sugar

Melt the butter in a small saucepan over low heat, then add the brown sugar and raise the heat to medium. Boil, stirring constantly, for 2 minutes. Add the cream and return to a boil, stirring constantly. Remove from heat and stir in the salt and vanilla. Let cool for 10 minutes.

Sift 1/4 cup of the confectioners’ sugar over the mixture, stirring with a whisk until smooth. If the glaze is thick enough for your liking, you can stop there. If not, sift the additional 1/4 cup sugar in. Place the cake (still on the wire rack) over a wax paper lined baking sheet. Pour the glaze over the cooled cake and allow it to drip down the sides. Allow the glaze to set completely before slicing and serving. Wrapped carefully, this cake will keep for several days at room temperature.
Wait for the glaze to set?? As IF!!
This cake was even better than I expected, by being less. Less rich, less sweet, less dense. It's surprisingly light! And the brown sugar flavor is beautiful, and definitely present, but more delicate than I thought it would be! It's just plain luscious.
And that glaze... oh heaven, the glaze! I tweaked it a bit, and took it in a more caramel-y direction, and I think it's fabulous. I would stop at the 1/4 cup of powdered sugar next time, more drizzle-y.
Stephen: "Let's just have this for dinner."

September 23, 2012

Small and Wonderful Things

Teaching my boys that Ponderosa Pines smell like butterscotch. And sometimes vanilla. Even cinnamon and chocolate, very rarely.
Buying homemade cookies from two girls on the corner of our street, because they remind me so much of my little sister. (They were saving up for Halloween costumes :)

Discovering that our upstairs neighbor, who also goes to church with us, is a total geek about Brandon Sanderson (author) too!!!

My coin necklaces!! (I fell for the big Silver one too. You know me and British stuff!)
Finding out there is a Stake Choir that just started... which will perform with a symphony... and a handbell choir... and they have babysitting!! Score.

Joe bringing me a dandelion, as-wonderfully-always, and finding a tiny jar to put it in, all by himself.  
Stephen (little) deciding, all on his own, to draw a Get Well Soon card for a family member we've been praying for. 

I love my life. 

September 22, 2012

French Chicken

Do you have a Dutch oven? No? Well, it's time to get one. Go find a cheap one at Target, or online. (Amazon is great!) Cooks Illustrated has some great reviews, but heck, just grab one anywhere. It's time to join the club. (You might need your husband, older brother, teenage son or significant other to lug it around for you though)

 I love my Dutch oven. Not for it's looks (in fact, it's so chipped it's number one on my "replace" list) but for it's function. Dutch ovens are so useful, and so versatile, and so bombproof, and make FABULOUS food!! I'm more than happy to lend it out, for the making of delicious recipes. Did you know you can make crusty, fluffy, fantastic knead-free artisan bread in these babies? Oh yes. I haven't done it yet, but I will. I have tasted it, and it is gooood. Anything you use a pot for, you can use a Dutch Oven for. To clarify, I'm talking about ceramic coated kitchen dutch ovens, not the black ones you bury in your campfire while camping. Can you use those on a stove? I don't even know.

Back to the recipes. I have made stew, roasts, pasta, fried things, and chicken in my Dutch oven. Today, in honor of YOU who make me SO happy, and my new blog design *eee!* I am sharing my favorite chicken recipe of all time. I learned the method from Cooks Illustrated, the rest is all me :). When Stephen was leaving me all alone every other week for field work, this was my comfort food. It is also my #1 meal for taking to friends and neighbors, because it is so darn easy! And people get sick of lasagna. It is made, of course, in a Dutch oven. If you don't have one, and won't just listen to me and go GET one, and don't have a friend, neighbor, or vague acquaintance to borrow from, I guess you could do the browning in a pan and move the whole thing to a lidded baking dish. But make sure you seal it!!

French Chicken (I also use this recipe for my Chicken Pot Pie)

1 chicken (simple enough! Make sure all those yucky little inside bits are removed first. I make Stephen do it. Also, get the highest quality, least-filled-with-additives chicken you can find, just this once. It makes a difference, trust me)
2-3 stalks of celery
2 medium yellow onions or one VERY large onion
4-6 peeled garlic cloves
2-3 sprigs of fresh thyme
half a lemon
kosher salt (or a coarse salt)
pepper
olive oil

Preheat your oven to 250 degrees. Season the breast side of the chicken generously with kosher salt and pepper. Heat about a tablespoon of oil in your Dutch oven on medium high heat. Swirl it around a bit to make sure the bottom is coated. When the oil is heated, but not smoking, place the chicken, breast side down, in the Dutch oven. It should sizzle as it hits the oil. Let brown for a few minutes on that side, and salt and pepper the bottom generously too (the side now facing UP). While browning, chop onion and celery into about 1/2-1 inch chunks. Big, coarse chunks. Carefully check the chicken. If the breast side has browned a bit, turn it over. (I find that sticking a wooden spoon into the cavity works best) Dump onions, celery, and garlic into the Dutch oven around the chicken. 
Put the lemon half inside the chicken. Let the chicken and veggies brown for a few minutes, stirring occasionally. If the bottom of the chicken is getting too brown (aka, burning) push some veggies under it. Once the veggies are softened a bit, and the bottom of the chicken is well-browned, add the sprigs of thyme, and place a sheet of foil over the top. Place the lid on top of that, and crumple the sides of the foil around the lid, sealing that gap as much as possible. Put the whole thing in the oven, and let cook for 80-110 minutes, depending on the size of your chicken. (90-100 minutes usually does it for me!) 

Remove from the oven and the Dutch oven and let sit, covered, for 20 minutes. 

While the chicken is resting, pour all the juices and solids left in the Dutch oven through a strainer into a bowl (or large glass measuring cup) Squish all the solids to squeeze every last bit of juice out, especially that lemon!

Best Gravy Ever

2 Tb butter
2 Tb flour
juices from chicken
salt and pepper

Melt butter in a small pot/saucepan over medium-high heat. Add flour, and stir constantly until it darkens a bit and smells toasty. Gradually pour in juices, whisking furiously!! It will thicken up fast, and you don't want chunks. Bring to a boil, then lower to simmer. Salt and pepper to taste. Sometimes I add a little bit more lemon too! (you can use this same method on any juices from any meat. If you don't have enough, add some chicken or beef broth)
Now, I know these pictures don't look like much. I should have used a darker plate, and made a colorful side-veggie. But I didn't, I just wanted to eat. So you're going to have to use your imaginations. 
Imagine the juiciest, most tender chicken you have ever had. Imagine it is lightly but thoroughly flavored with thyme, lemon, and other savories. This is the chicken that made me love dark meat. 
Now the gravy. People, you could put this gravy on a cardboard box and it would be delish. I adore gravy, and this is quite simply, The Best. It's smooth and savory, deeply flavored with garlic and thyme, and a tang of lemon... It is celestial. 
Together, they are simple chicken perfection. Are you drooling yet?? If not, read it again, because you should be! This is my favorite. Use it well.