February 28, 2013

Carrot Cake Cookies

Source: Lauren Strand via Pinterest

"I'm sorry, it's just one of those days." I think I said that four different times today. Once when I stared blankly at the woman at the sheriff's office while being fingerprinted (no worries, this is routine!), once after driving past our babysitter's house three times before realizing I didn't remember what it looked like AND I didn't have my phone to call my husband so he could tell me, again after saying something REALLY stupid to another couple at our training tonight, and again when it took me about 20 minutes to understand The Geologist's "Twilight" reference (our sitter's name is Bella...) There were probably more. We all have them, those days when our brain just completely deserts us. It's different than the moments when it just checks out; after a whole day you just want to wear a sign: "Please ignore me, it's one of those days!"

Regardless, you WILL get a recipe today! Because these cookies are just too darn yummy not to share, no matter how little brain I have! I wish I could eat about a half-dozen of them right now, I would feel much better... until I realized that I had eaten half a dozen cookies and then I would feel awful... so it's probably a good thing there are no cookies. Anymore. I already ate them all. It is officially time for bed. Tomorrow I get my wisdom teeth out, maybe if you're reeeeeally lucky I'll still be loopy while writing tomorrow's post! I'm pretty entertaining post-anesthesia while on pain meds. We can only hope, right? Okay April, stop talking. (typing...)

Carrot Cake Cookies (adapted slightly from Baker's Royale)
Printable Recipe

½ cup unsalted butter, browned and cooled
1 egg plus 1 egg yolk
½ cup dark brown sugar, packed
½ cup granulated sugar
¼ cup (2 oz) cream cheese, softened
1 Tb molasses
2 tsp vanilla
2 tsp cinnamon
1 tsp nutmeg
½ tsp baking powder
¼ tsp baking soda
¼ tsp salt
2 ¼ cups shredded carrots
2 ¼ cups unbleached all purpose flour
1/2 cups chopped pecans, toasted

Glaze:
2 cups powdered sugar, sifted
4 oz cream cheese, softened
2 Tb butter, melted and cooled
2-3 Tb milk

Heat and melt butter on medium heat in a small saucepan until it is brown and nutty smelling. Set aside to cool slightly. Preheat your oven to 350 degrees. Line a baking sheet with parchment paper or foil, spread nuts on baking sheet in a single layer, and let toast in the oven while it is preheating. Remove when browned and toasty-smelling.

Beat egg, yolk, and sugars together on medium speed until light and glossy. (about 1-2 minutes) Add cream cheese, vanilla, spices, baking powder and soda, salt and molasses and mix to combine. Add shredded carrots to mixture and mix to combine. Add in browned butter and mix to combine. Turn off mixture.
Using a wooden spoon or a sturdy spatula, fold flour and nuts into wet mixture. Place on lined/greased baking sheet by heaped tablespoonfuls, about a dozen per sheet. Bake cookies, one pan at a time, for 10-15 minutes. (mine turned out kinda big, so they took 15 minutes) Cool cookies on a wire rack before glazing.

For the Glaze:
Place sifted sugar, softened cream cheese and melted butter in a bowl and whisk to combine. Pour in 2 tablespoons of milk and mix to combine; add more milk as needed. Dip tops of cookies in glaze or drizzle over the top.
First of all, you've got to check out Baker's Royale, her recipes and her pictures are just fantastic. Her photos of food are art. I wish I could make food look that good!! I've learned a lot, but I'm pretty sure I don't have her eye for this stuff. I'll show you!


My Carrot Cake Cookies:
Was I trying to imitate her?? Heck yeah I was!! See, here's my problem. Drizzling is much more photogenic, obviously, but I don't think of that. I think, "Cream cheese frosting?? Um, we're going to need as much of that as possible!" and then realize "Oops. Those are kinda funny-looking..."
Enough about the pictures. I'm just whining because I took pictures of my cookies during a snowstorm and due to terrible light have very few that are usable. I love my funny-looking cookies, they're scrumptious!! Especially with all that cream cheese frosting! :) If you, like me, have ever thought, "Man, carrot cake sounds so good right now! But it would be silly to make a whole cake..." here is your answer!! These are soooo good. I don't know if it's the browned butter, the toasted nuts (you must toast your nuts!), the perfectly chewy, fluffy-but-not-too-light texture, the toothsome bits of carrots or the yummy spices, but they are cookies of genius and I adore them. You should make them, and I should go to bed. Hee hee, this was fun... :)

February 27, 2013

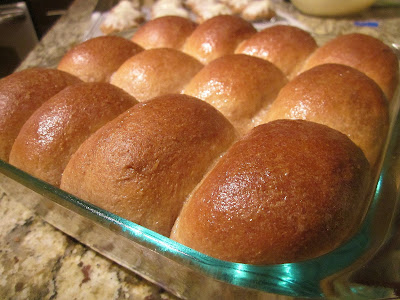
Soft & Fluffy Whole-Wheat Rolls

I have a confession: I used to be terrified of yeasty things. Bread, rolls, buns, all that. If it involved yeast, rising, and kneading, I stayed far, far away. Biscuits and quickbreads were easy and reliable. And then I started this blog, and began challenging myself. First I discovered bread so easy, all you had to do was let it sit there! Then I moved up, with a little kneading here, a little rising there... I screwed it up plenty of times, really! I haven't shown you the bowls of un-usable goo, or rock-hard lumps of dough, the recipes I had to try over and over before showing you one that really worked. But you know what? I've learned a lot, and I can say with enthusiasm that breads are now one of my favorite things to bake! When I started the "weekly menu" idea, I wanted to try and have a new bread every week. I thought surely I would run out of ideas in no time. But thanks to the wonders of the Internet (and Pinterest!) I've got a long ways to go before I stop showing you new breads. I hope you're trying a few!


Soft & Fluffy Whole-Wheat Rolls (adapted from An Oregon Cottage)
Printable Recipe

1 Tb yeast
1/4 cup warm water
1/4 cup butter, softened (1/2 a stick)
1/8 cup honey
2 eggs, room temperature (if doubling, use 3 eggs)
1/2 cup buttermilk
2 1/2 cups whole wheat flour
1 tsp. salt

2 Tb melted butter

Combine yeast and water in a small bowl and set aside. 

Cream the butter and honey together in the bowl of a stand mixer with the paddle attachment. Add the eggs and mix, scraping the sides. Add the buttermilk and yeast mixture.

Add flour and the salt, mixing until combined. Change to dough hook and knead for 2-3 minutes only, just until smooth and tacky, not gooey, adding a tablespoon or two of flour, if needed. (You can also do this all in a bowl or by hand, if you've got a strong arm! To knead the bread while it's sticky, just spray your hands and work surface with cooking spray, or coat them with butter, and go for it. It may be messy, but it will work! Just remember, DON'T flour it!)

Let sit in bowl, covered, to rise for one hour. Turn out onto a floured surface and knead a couple of times, then let rest 3 minutes. The dough should be smooth and elastic at this point.


Divide dough into 12 pieces, shaping each into a ball by stretching the top over and down the sides and tucking under a few times. Place balls of dough in a buttered 8 inch square baking dish. The rolls should be touching. Let rise, covered for 1 hour, or until rolls fill the pan.

Preheat oven to 350 degrees. Bake for 20-25 minutes until golden brown. Remove from oven and brush with melted butter. Let cool a few minutes before serving.
They really are the fluffiest whole-wheat rolls I've ever had! I can always use good whole-wheat recipes, because it's much healthier, and I'm awfully picky. And awfully fond of bread.
I made it all the way until it was time for the first rise before I realized... I'd used white flour!! They probably would have been perfectly yummy, but that would have defeated the point of this recipe, and I was on a time crunch... so into the bin that first batch went! 
I love the wheaty flavor of these rolls, and their soft fluffiness. The boys all agree! The Geologist liked his best with butter, while the little boys wanted them made into sandwiches for lunch. Ah, it feels so good to feed my family healthy things! Especially if they're scrumptious too. :)

February 26, 2013

Parmesan-Crusted Tilapia

Guess what happens when your boys (all three!) finish off the leftovers of the soup you were planning to post before you could take pictures?? That's right, yet another menu change!! Oh well, it's a good thing I had this one up my sleeve, but I promise a soup recipe soon! This is a wonderful "weeknight" meal that is so easy to throw together, if you happen to have some fish in the freezer and fresh Parmesan on hand. I don't know about you, but I nearly always do!


Parmesan-Crusted Tilapia (inspired by Rachael Ray)
Printable Recipe

about 6 tilapia fillets (thought this would work well with any fish, really!)
3/4 cup freshly grated Parmesan cheese (not the powdered stuff)
1 tsp paprika
1/2 tsp garlic powder
salt and pepper
1/2 tsp dried parsley (or about 1 Tb chopped fresh parsley)
1 lemon, cut into wedges

Preheat your oven to 400 degrees. Line a baking sheet with foil and set aside.

In a shallow bowl or pie dish, mix the cheese, paprika, garlic pepper, and parsley until well combined. Pay your fillets dry and season with salt and pepper. Brush/drizzle the fish with a little bit of olive oil and place in the cheese, patting it on to coat the fish on both sides.  

Place the fish on your prepared baking sheet and bake for 10 minutes (12 if your fillets are pretty thick). Turn the broiler on high and place fish under broiler for 5 minutes to crisp up the cheese. Serve with lemon wedges to squeeze over. 
This would be so yummy on just about any fish I can think of! Though I will say this is one of the few times I don't recommend smoked paprika, it's a little strong for the lighter-flavored fish. It might be awesome on salmon though!
We added the broiling step after noticing that the cheese was more gooey than crusty. Broiling was the perfect touch! It doesn't get crunchy, but has a much nicer texture.You end up with flaky, perfectly cooked fish, wonderfully seasoned with a slightly salty Parmesan coating. Simple and yummy, and that's all you need!

February 25, 2013

Weekly Menu Feb. 25

Source: whimsandsighs

This week we have:
Almond Joy Bread


For today, Feb 25...
Outside my window... It's bright and sunny, and our snow is starting to melt! It was fabulous staying inside and being so cozy yesterday, watching the snow whirl. It was almost blizzard-ish at times! I wish it could have lasted one more day, but oh well!

Around the house... I'm typing, and writing my list of "to-do's" for the day, Joe is watching Blue Planet. Both of my boys love these movies, and the Deep Sea is their favorite, with all those wild and wacky creatures that live down there in the dark!

I am thinking... It looks like I'll be living on fruit, vitamins, and salad for a while! One of my new medicines is causing a serious lack of appetite, and the only things that sound good are fruit, fresh veggies, and bread. It's hard to eat anything else. I was be-moaning this fact all weekend, and eating nothing but bread and pretzels, when my brilliant husband realized that if I am smart about it, this could be a genius diet! So here we go, we'll see what happens! (Don't worry Mom, I'll get protein in there too)
Source: Jaime Pool via Pinterest

I am going... Today is the day of running errands! Stephen sprouted out of his jeans, and needs more pronto, library books are due, I need to get my fingerprints registered, INR checked, and house to generally get in order! I'm getting my wisdom teeth out on Friday, and I want everything to be taken care of so The Geologist doesn't have to pick up my slack!

I am thankful... for repentance, forgiveness, and the ability to say "I'm sorry." A random headache made me awfully cranky last night, but no matter how many times I would argue with my husband over nothing, I could apologize, and everything was forgiven! Isn't that a wonderful thing?

I am reading... C.S. Lewis's "Space Trilogy". Finished "Out of the Silent Planet" last night and on to "Perelandra". I love his imagery, his symbolism, and his ability to interject subtle humor even in his "grown up" books.
I am hoping... Lol, I'm hoping that the third time is the charm with my Cinnamon Swirl Brioche!! I am determined to make this recipe work, if it's the last thing I do!!

I am looking forward to... Spring. Usually I can enjoy winter for months and months, but this year, with such an active boy and giant beastie, I want to get out of this house! I'm more active these days too, which certainly helps.
Source: carouselswirl


Something new about me... I love camping and roadtrips! The Geologist set up a new screensaver for our computer, and it's supposed to flip through all of our pictures, but it seems to have picked a few folders that it just keeps repeating. One is from a spring break trip we took to Southern Utah when the boys were smaller. Every time I see them it makes me want to go back!! We haven't actually camped since then, being so busy with thesises and all that, but now that we have the greatest work schedule EVER, yet another reason why I can't wait for warmer weather!! I want to go camping!!

Guilty pleasures... Feeding my beastie treats. I know I'm not supposed to give in when she begs, but that face is just so adorable, I can't help it!! She loves popcorn and fruit the best, but has been known to enjoy a bit of Twizzler from time to time... she's her Mama's girl!

Favorite Things... Sparkle. All things shimmery and glittery and twinkly, I love it! When I was 16 I painted my basement bedroom dark blue, and stenciled silver stars all over the wall. I loved that bedroom, except for its tendency to house giant Missouri spiders... You'll never see me in head-to-toe sequins, but I love a touch of sparkle. 

February 24, 2013

Flaky Cinnamon Layered Biscuits

I promised you a Cinnamon Swirl Brioche recipe today, but I haven't quite nailed it down yet. I'm on my third batch and still working out the kinks, so I have another cinnamon-y recipe to share in its place!

I'm looking out at some serious snow this morning. Church was actually canceled!! This is more like the Colorado winters I remember!! The drifts are piling up against the garage doors, the snow is whirling in so many directions it's hard to tell if any is actually coming down, and our patio is slowly but surely filling up! A perfect day to stay inside and bake! Or it would be, if I wasn't out of flour from making brioche three times...

Flaky Cinnamon Layered Biscuits (adapted from Salad In a Jar)
Printable Recipe

2 cups flour
4 Tb sugar
2 tsp baking powder
½ tsp salt
½ tsp baking soda
6 Tb cold butter
2 Tb shortening (you can use more butter if you don't have shortening)
¾ cup buttermilk
1/2 tsp vanilla
2 tsp sugar plus 2 tsp cinnamon for layers

coarse sugar and 1 Tb melted butter for the tops

Preheat your oven to 425 degrees. Line a baking sheet with parchment paper or grease it.

Whisk dry ingredients together in a large bowl. Cut in the butter and shortening until pieces are no bigger than small peas. Add buttermilk and vanilla and stir until the dough mostly comes together. (You can also do all of these steps in a food processor)

Turn the dough and dry unincorporated bits out onto a well-floured surface. Knead about about 3-4 times until all the dough comes together. Shape dough into a square.
Roll the square of dough out about ½ inch thick. Brush/sprinkle the surface of the dough with a little bit of water, just to dampen it. Sprinkle half of the cinnamon-sugar mixture over ⅔ of the dough.  
Fold the un-coated third of the dough over on top of the cinnamon layer, then fold the opposite third over the top (like folding a letter) 

Roll this rectangle out again until it is a little bit more than 1/2 inch thick, sprinkle on the rest of the cinnamon sugar, fold up like a letter again, then fold into thirds one more time. (you'll end up with a fat square)
Roll dough back out to a ½ inch thick square and cut into 12 squares with a sharp knife. 

Place the biscuits on prepared baking sheet, brush with melted butter, and sprinkle with coarse sugar. Bake for 5 minutes. Reduce temperature to 400 degrees and continue baking for another 12 minutes. Let cool on a wire rack and serve!
I am in LOVE with these biscuits! We ate them so fast the poor Geologist never got to try one. He loves cinnamon so much, I suppose I will just have to make them again!
They're barely, barely sweet, the tops get nice and crunchy (you can use this big decorating sugar on top, next time I'm going to try turbinado!) they're light and flakey as can be...
... And those gorgeous layers of cinnamon!! Isn't that beautiful?? Pretty, delicious, and easy! A new favorite of mine, definitely!
By the way, the biscuit recipe itself is a winner, if you wanted to skip the cinnamon sugar, they'd be fabulous plain as well!
I hope you give them a try! And if you're one of the states getting snowed in along with us, (and there are quite a few!) Stay warm and safe!

February 23, 2013

Small and Wonderful Things 19

Balloons
Source: belleandbear

Little Boys' Prayers

Naps
Source: magicbazaar

Grandparents

Dogs

Medicines that work and Doctors who care

Sunshine
Source: Amy Gilles via Pinterest

Technology that keeps us connected

Friends. Old, new, close, far, all shapes and sizes and ages. I love you!
Source: Etsy

February 22, 2013

Simple Tiramisu

Today I am posting my first ever recipe request! I am excited, this was an adventure for me! Someone (Hello, Anonymous!) requested a simpler Tiramisu recipe after The Geologist's botched attempt at a competition last week. I have never actually tasted tiramisu before this, can you believe it? But I am always up for a challenge! I see what they meant, I found recipes for this dessert that you had to start two days ahead! That's just silly!! Then I started searching simpler recipes, and many called for raw eggs, which I know gives many people the heebie-jeebies, so I kept up my quest... I found one with eggs, it said you could skip the eggs, I was still skeptical... and then I went out to buy my ladyfingers. Lo and behold, a recipe on the box! And what does it use to make the mascarpone filling fluffy and creamy?? Whipping cream! Ding Ding!! We had a winner! And it just makes sense, doesn't it? So here is my tweaked easy-as-pie tiramisu recipe, complete with my thoughts, tips, and variations. I hope you have fun with it!


Simple Tiramisu
Printable Recipe

1 cup of cold heavy whipping cream
8 oz mascarpone cheese
generous pinch of salt
20-40 ladyfingers (depending on how big yours are! I needed 40, mine were skinny)
1 cup brewed coffee (you can do de-caffeinated if you'd like!)
1/2 cup sugar
cocoa powder
bittersweet or semisweet chocolate

*Optional: 2 Tb coffee liqueur, amaretto, or 1 tsp vanilla

Beat mascarpone, salt, and sugar together until smooth and slightly fluffy. While beating, gradually add the cream, and beat for a few more minutes until thick and fluffy.

Using half of your ladyfingers, quickly dip each one in coffee and line the bottom of an 8 inch square baking dish.
Very gently and carefully, spread half of the mascarpone mixture over the ladyfingers.
Add another layer of coffee-dipped ladyfingers, the rest of the mascarpone, and dust with cocoa powder and optional chocolate shavings. Cover tightly, refrigerate overnight and serve cold.
Tips and Variations:
~ The coffee flavor was just a hair strong for me. Next time I would brush the ladyfingers with coffee instead of dipping. You can do either.
~ You can add a teaspoon of vanilla to the mascarpone, or coffee liqueur/amaretto to the coffee. I have seen recipes with both, but none with the vanilla. That's just me.
~You could add a layer of chocolate shavings and/or cocoa on top of the first layer of mascarpone. I did!
New food adventures are fun!! Allrighty, so here are my thoughts: first, is that easy or WHAT??
Second, my ladyfingers were very very light and crispy. I expected them to be like little fingers of cake. I was very worried when I dunked them in coffee that I would have a mess of soggy mush the next morning, but like magic, they turned into fluffy cake! I am amazed! I mentioned that the coffee flavor was a bit strong for me, so I would brush them instead of dunking next time. I don't drink coffee, but actually do love the flavor, I just thought it overwhelmed the other elements.
Mmmm, mascarpone... for some reason I was expecting it to be closer to cream cheese. Nope!! No tang! It has a very light, fresh, sweet cream flavor. It was delicious, but I would add some vanilla next time. I'm pretty sure that's not authentic, but who cares. I loved the little taste of the bittersweet chocolate in the middle too. I'm glad I threw caution to the winds and added it there.
Overall, I really enjoyed it! The only reason I could possibly see for making this more complicated is if you wanted to make your own ladyfingers. I'm not that ambitious yet.