My very dear friend Cherie, she of the Carrot Cake and Chocolate Almond Souffle Torte, wanted to join my Nibbles and Novels party, but has no platform to link, so I am posting for her!! She sent me the most beautiful, hilarious book called " A Thousand Ways to Please a Husband: With Bettina's Best Recipes". It is gorgeous, and old (yay!!) and blue. And an absolute riot.
The book kind of has a story, but not really. Bettina is a newly-wed, perfect in all things home-making. Friends, family, and neighbors are all enraptured with her clever, thrifty little ways. And yes, this is absolute fiction. What woman do you know who would say:
"Browns and tans seemed safest in a little house like this, and I knew I shouldn't tire of them as of any other colors!"
It is chock-full of old-fashioned recipes (lacking oven temperatures), and I will admit plenty of great house-keeping tips, it's just hilarious how earnest and slavish and perfect little Miss Bettina is. And of course, she brings all of her single, hotel-dwelling friends over to the light of "keeping house". It's fun to peek through, if you can find it. And a treasure I will keep forever and ever. And I will definitely try one of these vintage recipes in another Nibbles and Novels!
A few recipes, just for old-fashioned fun's sake:
Creamed Tuna on Toast Strips
1 T butter
1 T flour
1/4 t salt
1 T pimento, cut fine
1 C milk
3 slices of bread (No More!! No Less!!?)
1/2 C tuna
Melt the butter, add the flour, salt, and pimento. Mix well. Gradually pour in the milk. Allow the mixture to boil one minute. Add the fish, cook one minute and pour over toasted strips of bread.
Radishes
12 radishes
1 C chopped ice
Wash the radishes thoroughly with a vegetable brush. Cut off the long roots and all but one inch of the green tops. These tops make the radishes easier to handle and more attractive. (giggle) Serve in a bowl of chopped ice.
Alligator Pear Salad
2 alligator pears (what in the heck is an alligator pear?!)
1/2 t salt
1/4 t paprika
1/4 t sugar
1/4 t dry mustard
4 T lemon juice
4 T orange juice
1/2 C salad oil
Peel the pears, then cut in halves and remove seeds. Cut in one-half inch strips. Sprinkle with lemon juice and chill. After mixing the rest of the ingredients, chill again. When ready to serve, arrange the pear strips on top of lettuce and top with the dressing. Garnish with thin strips of pimento.

October 31, 2012
Reminder!!
Nibbles and Novels goes live tonight at 10:00 PM! Dust off those book reviews and literary thoughts, and please join up!! See you there!!
October 30, 2012
Oven-Roasted Balsamic Green Beans
Okay, I have a confession. For the longest time, green beans were the most blah of vegetables to me. Not gross, just "eh". I liked green bean casserole, but that's because it had gravy-ish substance and crispy things on top. Then one day, in an effort to be nifty and healthy, my Mom roasted our green beans under the broiler. Hel-lo!! Since then, this is the only way I like them. Just like salad, and exercise, green beans are making their comeback in my healthy-things-depleted life!! And I'm so happy to see them again.
So is my husband. Turns out they're his favorite vegetable. His Mom had quite the green bean bonanza garden and would give bottles of them away every year. That was before roasting, so I hadn't learned to appreciate them. He, on the other hand. would open a jar and just chow down. Is that weird?? Who knows. He was healthier than me!! Now, oh how I wish I had some of those garden-fresh green beaners to try this technique on! If you, like the former me, could care less about these, (or other long, skinny veggies) try hitting them with this method. It just might convert you!

Oven-Roasted Balsamic Green Beans
Printable Recipe
fresh green beans, rinsed and ends snapped
kosher (flake) salt
pepper
balsamic vinegar
extra virgin olive oil
Toss the green beans in about 1 Tb olive oil. Spread in a single layer on a rimmed baking sheet. Sprinkle with salt and pepper. Drizzle lightly with balsamic vinegar.
 Place baking sheet under broiler for 8-15 minutes, depending on how well-roasted you like your veggies! (I like mine with a few brown spots) Remove and serve.
 Easy, right? And so tasty!! Oh yeah, and ridiculously good for you. Did I mention that?
 They still have the crisp-ness of fresh green beans, with a roasted, seasoned layer. Hey look, I managed to make these veggies look awfully good! Yay me :)
 And the vinegar takes it over the edge! It adds a tangy, almost fruity note. SO good!! This is my new favorite way to eat green beans. You should try it. I'm going to do this to asparagus next spring... mmm...
So is my husband. Turns out they're his favorite vegetable. His Mom had quite the green bean bonanza garden and would give bottles of them away every year. That was before roasting, so I hadn't learned to appreciate them. He, on the other hand. would open a jar and just chow down. Is that weird?? Who knows. He was healthier than me!! Now, oh how I wish I had some of those garden-fresh green beaners to try this technique on! If you, like the former me, could care less about these, (or other long, skinny veggies) try hitting them with this method. It just might convert you!

Oven-Roasted Balsamic Green Beans
Printable Recipe
fresh green beans, rinsed and ends snapped
kosher (flake) salt
pepper
balsamic vinegar
extra virgin olive oil
Toss the green beans in about 1 Tb olive oil. Spread in a single layer on a rimmed baking sheet. Sprinkle with salt and pepper. Drizzle lightly with balsamic vinegar.


Oven BBQ Brisket
I love good barbecue. The smell, the taste, the tender meat... and the sauce! I'm one of those people who lives for the sauces. And gravies. And delicious pourable things of all kinds. French fries? Merely a vehicle for fry sauce. Mashed potatoes? Sure, they're great, but I claim all the gravy!! And while some barbecue purists believe all their flavor is in the rub, I'll take mine doused in sauce, thank you! Deliciousness.
The problem with most barbecue is that to truly do it correctly, you have to smoke things for years. I don't have a smoker, or years to wait. Luckily for me and my patience, my Mom has perfected the most simple, tender delicious brisket, and all you need is an oven. Plus lots and lots of foil. Oh, and your house is going to smell mouthwatering all day.

Oven BBQ Brisket
Printable Recipe
1 large beef brisket (2-3 pounds)
kosher salt and pepper
lots of foil
1 bottle (or homemade recipe) of your favorite BBQ sauce
Preheat oven to 250 degrees. Trim most of the fat layer off of the brisket. Leave a few thin-ish patches on.
Sprinkle both sides with salt and pepper. Lay the brisket, fat up, on 3 layers of foil, with enough extra to wrap completely around the brisket. Slather the top with BBQ sauce, making sure it is well-covered (this usually uses about half the bottle for me. We like KC Masterpiece Original)
Fold the foil over, and double-crimp the edges. Lay the whole foil packet on a baking sheet, and bake for 6-8 hours. Remove from the oven and let rest 1 whole hour. This step is critical!!!
After the hour rest, unwrap. Save the juices/sauce. Slice the brisket against the grain, and serve with extra sauce poured over.
 This brisket turned out so tender it wouldn't even hold together in slices!! Those little patches of fat you left on will melt into the meat, making it oh-so-juicy and delicious!


The problem with most barbecue is that to truly do it correctly, you have to smoke things for years. I don't have a smoker, or years to wait. Luckily for me and my patience, my Mom has perfected the most simple, tender delicious brisket, and all you need is an oven. Plus lots and lots of foil. Oh, and your house is going to smell mouthwatering all day.

Oven BBQ Brisket
Printable Recipe
1 large beef brisket (2-3 pounds)
kosher salt and pepper
lots of foil
1 bottle (or homemade recipe) of your favorite BBQ sauce
Preheat oven to 250 degrees. Trim most of the fat layer off of the brisket. Leave a few thin-ish patches on.
Sprinkle both sides with salt and pepper. Lay the brisket, fat up, on 3 layers of foil, with enough extra to wrap completely around the brisket. Slather the top with BBQ sauce, making sure it is well-covered (this usually uses about half the bottle for me. We like KC Masterpiece Original)
Fold the foil over, and double-crimp the edges. Lay the whole foil packet on a baking sheet, and bake for 6-8 hours. Remove from the oven and let rest 1 whole hour. This step is critical!!!
After the hour rest, unwrap. Save the juices/sauce. Slice the brisket against the grain, and serve with extra sauce poured over.


Doused in delicious smokey sauce... to change the flavor, all you have to do is try different sauces! Smokey Texan style, sweet KC style, tangy Carolina style... I love them all!

Stephen likes to have leftovers in sandwiches. I wouldn't know, I never get leftovers :)

No knife needed! Super tender, flakey, fall-apart perfect brisket, with so little effort! Just make sure you invest the time in it, or it will turn out dry and tough. Go forth and barbecue!
October 29, 2012
Weekly Menu Oct 29
I LOVE this new menu thing!! It's so fun to plan one big bloggable meal, and then NOT have to photograph everything else I eat. And I love the organization!! Yes, I did have one hiccup with the dessert last week, but that's because I wasn't quite caught up yet. From now on, I shall be. The recipes I chose this week are all very easy, and very simple, but perfectly delicious. (Okay, the coffee cake is a bit more complicated, but that's okay!) All together, they made one of the yummiest meals we've had in a long time. And it's fun for me to figure out actual measurements for things I usually just "wing it" on.
Remember, Thursday is November First, which means Nibbles and Novels!! Please oh please join up this month, any of your posts about or inspired by books!! I'll be posting a recipe, but even if you have an old book review or something, I'd love you to share it!!
This week we have:

The New Pumpkin Family Portrait
In other news, I participated in my first "swap" party a little while ago, and it's time to link up! We were all supposed to meet new blogging friends, learn a bit about them, and then send them a pair of fun socks (or something sock-related) I hope Courtney from Chase All Your Dreams likes the ones I sent her!! They were fun to find. Mine are from Britt at Yellow Umbrella, and they are so fun!! Thank you Britt! And thank you Sarah from Life in A Break Down for hosting! I can't wait for the next one :)

I'm wearing one from each pair. I think they work, don't you??
October 28, 2012
Cranberry Ginger Bread
Sorry for the menu change!! I promise you Cranberry Upside-Down Cake sometime soon, but life just got really crazy this week. Some bad crazy, some good crazy. But I still think you'll like the replacement.
Gingerbread is something I have very little experience with. I've only really had store-bought, I think. If my Mom ever made it while I was growing up, I have forgotten. (Sorry Mom!!) But it is SO synonymous with the holidays!! Store-bought gingerbread, even the great stuff from Germany, or Holland (You know I've tried it while shopping for my Stroopwafels!!) is very tasty, but a tad dry. This year I am determined to master the classic Gingerbread. The one that comes to mind while singing carols, and reading Christmas stories, and hanging glass icicles on the Christmas tree... Moist, spicy, deep flavors... I've got my eye on a few. This is not the classic, it's really more of a ginger bread than true Gingerbread, but it is still yummy. It's a bit of a concoction, kind of an experiment, but I think it turned out scrumptious. And pretty. And I am loving things with oats in lately. :)
Shared at On the Menu Monday

Cranberry Ginger Bread
Printable Recipe
1/4 cup cooking/vegetable oil
1 cup quick oats
1 cup all-purpose flour
1 cup brown sugar
2 teaspoons baking powder
1/2 teaspoon baking soda
1/4 teaspoon salt
1 teaspoon ground cinnamon
1/2 tsp ground ginger
1/2 tsp ground nutmeg
3/4 cup Greek yogurt or sour cream
1 Tb molasses
2 eggs
2 teaspoons vanilla extract
1/4 cup crystallized ginger, chopped
1 cup cranberries, fresh or frozen (not thawed) *These are pretty tart; I like them that way, but if that's not your thing, go ahead and used dried. They're sweeter*
1 cup white chocolate chips (optional)
Preheat your oven to 350 degrees. Grease and/or line 1 loaf pan. Spread the oats on a baking sheet (with a rim). Toast them in the oven while it's preheating, about 10 minutes or until they turn a bit golden. Let cool for a few minutes, then combine with the flour, sugar, baking powder and soda, salt, and spices in a large bowl.
In a separate bowl whisk yogurt/sour cream, oil, eggs, molasses, and vanilla together until just combined. Add wet ingredients to dry, and stir until just barely combined (streaks of flour are fine). Stir in cranberries, ginger and chocolate chips gently (if using).
Pour batter into the prepared pan and smooth out the top. Bake about 45-50 minutes or until a toothpick inserted comes out clean. (If the bread is browning too quickly, place a piece of aluminum foil loosely over top) Let cool in the pan on a wire rack for a few minutes, then remove from pan and let cool at least 10 minutes more.
 I love that bumpy brown top. I've seen similar breads topped with cream cheese icing, but I didn't really think it was necessary. You certainly could if you wanted to though!!
 Warmly spiced toothsome bread with a bit of depth from that molasses, with those surprises of tart, tangy cranberries... I love cranberries!! I love things tart. I recommend white chocolate chips in here too, I just skipped them this time because I didn't have any. (And Stephen hates white chocolate... sigh)
 Cranberries and white chocolate are SUCH good friends. But then, so are cranberries and spices!! The texture the oats give this bread is so wholesome and yummy. And don't worry, they blend right in. It's not like chewing on a bunch of barely-cooked oats.
 And ginger. I am now a bit obsessed with ginger. I used to hate it with a passion, but it looks like that is one taste I've been able to gain back! Hooray!! Though I don't think I could handle those ginger chews yet, Mom. This may be as far as I get.
Gingerbread is something I have very little experience with. I've only really had store-bought, I think. If my Mom ever made it while I was growing up, I have forgotten. (Sorry Mom!!) But it is SO synonymous with the holidays!! Store-bought gingerbread, even the great stuff from Germany, or Holland (You know I've tried it while shopping for my Stroopwafels!!) is very tasty, but a tad dry. This year I am determined to master the classic Gingerbread. The one that comes to mind while singing carols, and reading Christmas stories, and hanging glass icicles on the Christmas tree... Moist, spicy, deep flavors... I've got my eye on a few. This is not the classic, it's really more of a ginger bread than true Gingerbread, but it is still yummy. It's a bit of a concoction, kind of an experiment, but I think it turned out scrumptious. And pretty. And I am loving things with oats in lately. :)
Shared at On the Menu Monday

Cranberry Ginger Bread
Printable Recipe
1/4 cup cooking/vegetable oil
1 cup quick oats
1 cup all-purpose flour
1 cup brown sugar
2 teaspoons baking powder
1/2 teaspoon baking soda
1/4 teaspoon salt
1 teaspoon ground cinnamon
1/2 tsp ground ginger
1/2 tsp ground nutmeg
3/4 cup Greek yogurt or sour cream
1 Tb molasses
2 eggs
2 teaspoons vanilla extract
1/4 cup crystallized ginger, chopped
1 cup cranberries, fresh or frozen (not thawed) *These are pretty tart; I like them that way, but if that's not your thing, go ahead and used dried. They're sweeter*
1 cup white chocolate chips (optional)
Preheat your oven to 350 degrees. Grease and/or line 1 loaf pan. Spread the oats on a baking sheet (with a rim). Toast them in the oven while it's preheating, about 10 minutes or until they turn a bit golden. Let cool for a few minutes, then combine with the flour, sugar, baking powder and soda, salt, and spices in a large bowl.
In a separate bowl whisk yogurt/sour cream, oil, eggs, molasses, and vanilla together until just combined. Add wet ingredients to dry, and stir until just barely combined (streaks of flour are fine). Stir in cranberries, ginger and chocolate chips gently (if using).
Pour batter into the prepared pan and smooth out the top. Bake about 45-50 minutes or until a toothpick inserted comes out clean. (If the bread is browning too quickly, place a piece of aluminum foil loosely over top) Let cool in the pan on a wire rack for a few minutes, then remove from pan and let cool at least 10 minutes more.


As soon as we get closer to Christmas, there will be true Gingerbread!!
October 27, 2012
Small and Wonderful Things 5
Awesome Fall nail polish!! (The picture doesn't do it justice. It has gold AND copper sparkles!!)

For once, being the only one in my family who DIDN"T catch the awful cold with the gucky sore throat!! Woohoo!!
Joe organizing all his Gardettos by type

Finding a new toy for Bracken that she adores instead of destroys.
Boys doing the laundry

Buying a muffin at a store and realizing that yours are WAY better
New, heavy, gorgeous, RED mixing bowls!!!

Snow. And Christmas songs. And already getting all fluttery with the magic of Christmas... So I'm early! So what!!
Chrysanthemum Bouquets!!!

Fall. I. Love. FALL.
October 26, 2012
Whole Wheat Pancakes with Buttermilk Syrup
Today is a day of family history. The history of my family. Or, more specifically, my Mom's family. When she was visiting us in Utah over the fourth of July, I was lucky enough to get out of the hospital just in time to go to a very special family reunion with her. A reunion of two families: The Watts and Rytting families. Ardean Watts was her Dad's (my Grandpa's) best friend. His family, and my Mom's family, the Ryttings, practically grew up together. Camping, holidays, various celebrations, all spent together before everyone grew up and scattered to the winds. Most of them happened to be back in Utah for a wedding, and decided to get the whole "clan" back together for a Fourth of July breakfast, including all possible progeny. It was quite an experience! We all got to meet each other, catch up, and listen to Ardean's notorious story-telling. And eat these scrumptious, family-history-laden pancakes, which are now my favorite pancakes of all time.

Whole Wheat Pancakes (from the Watt's family recipe)
Printable Recipe
1 cup whole wheat flour
1/2 tsp salt
1 tsp baking soda
1 cup buttermilk
2 Tb molasses (can also just use regular sugar)
2 Tb oil
1 egg, separated
a tablespoon or two of ground flaxseed (optional)
Whisk dry ingredients together in medium bowl. Mix all wet ingredients, except egg whites, in a large bowl. Add dry ingredients and mix till fully incorporated. Beat egg whites until they form soft peaks. Gently fold egg whites into batter, right before cooking. (you can skip beating and folding the whites if you'd like, but it makes the pancakes much lighter)
Buttermilk Syrup
1 cup buttermilk
1 stick butter (1/2 cup)
1 tsp baking soda
1 cup granulated sugar
2 Tb light corn syrup (or golden syrup, if you have it!!)
2 tsp vanilla
Combine all ingredients except vanilla in a LARGE saucepan. Heat over medium heat until it starts to bubble. Stir continuously while bubbling for 5 minutes. remove from heat and stir in vanilla. Let cool mostly before serving.
 I must note that to be completely true to the tradition of these pancakes, they should be served topped with vanilla greek yogurt, fresh berries, chopped mango, sliced almonds and the buttermilk syrup. I had none of these things on hand, so I just went with the syrup. But adding at least the yogurt is pretty fabulous!!
 These are the best whole-wheat pancakes I've ever had. I usually avoid whole wheat anything, because it so often turns out dry, or crumbly. But these are soft, and light, and positively delicious!!
 And then there's that buttermilk syrup... oh heavens!! Creamy, sweet, buttery... Lets just keep in mind the whole wheat, and tell ourselves this is healthy, right?? Who knew whole-wheat could be decadent!! But trust me, it is.
 A perfect breakfast for a Fall pretend-birthday. Stephen was gone for a few days to check on an oil well, so we celebrated our Joe's 5th birthday on Saturday!!

Whole Wheat Pancakes (from the Watt's family recipe)
Printable Recipe
1 cup whole wheat flour
1/2 tsp salt
1 tsp baking soda
1 cup buttermilk
2 Tb molasses (can also just use regular sugar)
2 Tb oil
1 egg, separated
a tablespoon or two of ground flaxseed (optional)
Whisk dry ingredients together in medium bowl. Mix all wet ingredients, except egg whites, in a large bowl. Add dry ingredients and mix till fully incorporated. Beat egg whites until they form soft peaks. Gently fold egg whites into batter, right before cooking. (you can skip beating and folding the whites if you'd like, but it makes the pancakes much lighter)
Buttermilk Syrup
1 cup buttermilk
1 stick butter (1/2 cup)
1 tsp baking soda
1 cup granulated sugar
2 Tb light corn syrup (or golden syrup, if you have it!!)
2 tsp vanilla
Combine all ingredients except vanilla in a LARGE saucepan. Heat over medium heat until it starts to bubble. Stir continuously while bubbling for 5 minutes. remove from heat and stir in vanilla. Let cool mostly before serving.


Shared at Foodie Friends Friday
October 25, 2012
Bacon & Egg Spinach Salad
Growing up, I hated salad. Pretty normal, wouldn't you say?? Then, at about 17 years old, I found out I could never eat salad (and lots of other things!) again, without pretty painful consequences. Funny how gradually, the one thing I missed more than anything else was salad. There really is no substitute for that crisp, cool mix of fresh lettuce and veggies. Ah, salad. Who craves salad, anyway?! Weirdos who don't like chocolate, apparently :) No, I'm just kidding. The chocolate came later. But salad has remained my number one craving.
Luckily, I can eat it now!! Miracle of miracles!! So it is high time to teach my boys to like it. We're starting a bit late, but hit a home run with this one. When I was a kid it was the only one I actually liked, and it still seems to be a child-pleaser. Little Stephen loved it from the first bite!! He even liked the onions!! Joe took some convincing, but about halfway through it he was sold too. Sure, you're adding bacon and eggs and cheese, so you might be lowering the health-factor a tad, but I say the awesomeness of spinach overcomes all!! :)

Bacon & Egg Spinach Salad (from my Mom)
Printable Recipe
1 pound fresh spinach
1/3 cup olive oil
1 clove garlic, minced
1/4 c balsamic vinegar
1/4 c lemon juice
1/2 t salt
pinch of sugar
dash pepper
1/4 cup grated parmesan cheese
2 hard cooked eggs, diced
4-6 slices crisp bacon, crumbled (save grease)
dash pepper
1/4 cup grated parmesan cheese
2 hard cooked eggs, diced
4-6 slices crisp bacon, crumbled (save grease)
sliced mushrooms
1/2 small red onion, sliced thin
Rinse and tear spinach a bit, then chill. Marinate sliced onions in 1/4 cup balsamic vinegar, 1/2 tsp sugar, and a pinch of salt for about 30 minutes.
Rinse and tear spinach a bit, then chill. Marinate sliced onions in 1/4 cup balsamic vinegar, 1/2 tsp sugar, and a pinch of salt for about 30 minutes.

Combine oil, garlic, vinegar, lemon juice, salt, pepper, and sugar in a small saucepan. Heat until it just starts to simmer. Remove from heat and stir in about a tablespoon of the bacon grease.
Toss spinach with eggs, mushrooms, bacon, and onions. Drizzle half the dressing over the salad and toss again. Top with parmesan cheese. (or toss it in too) Reserve the rest of the dressing for people to drizzle as they please.
Toss spinach with eggs, mushrooms, bacon, and onions. Drizzle half the dressing over the salad and toss again. Top with parmesan cheese. (or toss it in too) Reserve the rest of the dressing for people to drizzle as they please.

Ah, it was so fulfilling feeding my boys salad!! And they didn't throw fits! Well, Joe threatened, but we won him over... dessert bribes are awfully useful...

Tangy, slightly sweet dressing, tender spinach, crunchy smokey bacon...

Eggs!! I love eggs in salad. And those onions turned out super yummy too. And I don't even LIKE raw onions!!

I skipped the mushrooms for my boys, but I love having them in there usually. I am so happy to be eating salad again! I hope you try this one. It's a classic, and a winner. The End.
October 24, 2012
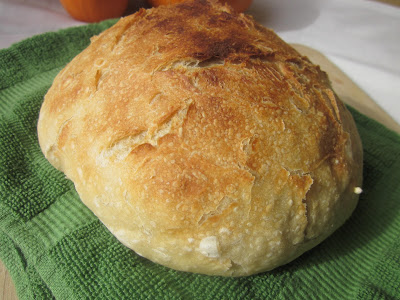
Slow-Cooker Bread
Pinterest sparked the curiosity. An Aunt fanned the flame. I accepted the challenge. Bread in a slow-cooker?? No way.
I'm almost tempted not to post this. It completely undermines my attempts to convince you all to go buy a Dutch Oven. Okay, not completely, but it doesn't help!! Because the truth is, you can make fabulous bread in your slow-cooker. It's easy, quick(ish), delicious, and a great way to bake bread without turning on the oven!! I tried a few different batches to iron out some kinks, and give you lots of tips to make it work best. This is one of those times where I simply must say: Thank goodness for Pinterest!! I never would have dreamed this was possible without it.
Oh, and you also no longer have any excuse to be afraid of homemade bread, ever again. :)
Slow-Cooker Bread (from Artisan Bread in 5)
Printable Recipe
This is a half batch, enough for 2 small loaves
1 1/2 cups lukewarm water
1/2 Tb yeast
1/2-3/4 Tb kosher salt
3 1/4 cups flour
*They also have recipes for other breads that you can bake the same way*
Stir water, yeast, and salt together in a large bowl, or container with a lid. Dump in the flour and mix together into a wet, shaggy dough.
 Let rise, covered but not sealed (the yeasty air needs to escape) for 2 hours at room temperature. You can use the dough right after the 2 hours rising time, but I suggest putting the dough in the fridge for another hour first. My loaf rose better, and stayed nice and round when I used cold dough. You can keep this dough in the fridge for 2 weeks; use it anytime, and it will develop a bit of a sourdough flavor. Their original recipe makes enough dough for 4 loaves.
 When you're ready to bake, turn your slow-cooker on to high (Mine worked better when it was preheated)
Sprinkle some flour over the top of the dough, and pull out about a 1 lb chunk (if you made a half batch, like me, it will just be half of the dough) Return the rest to the fridge.
Form a ball by tucking the sides in and under a few times, stretching the top surface of the dough ball. (They have a video of this technique here, it's important!)
 Place dough ball on a sheet of parchment paper and lower into the slow-cooker. Cover and cook for 1 hour. (Some people have reported it taking up to 2 hours) It will be pale when it is done, and the outside will be slightly stiff, not hard and crusty.
 If you want to darken/crisp up the crust, put the loaf on a baking sheet or stone and put in the oven under the broiler for 5-10 minutes. Let cool completely, and slice!
 I like my crusts crusty, so I broiled mine. Lovely!
 Now, it's hard to decide which I like better, this or the Dutch Oven Artisan Bread. I like the Dutch Oven bread's crust better, so crisp and crackly, BUT I have to admit that this bread is definitely softer.
 I'm talking heavenly, pillowy soft. I'm really surprised how wonderful the texture turned out, actually! And great flavor, with such simple ingredients! Makes me wonder why we bother adding all that other stuff. Although I do want to try some variations of this one already... :)
 I think if I wanted to make a sandwich, I would use this, but for just eating with a bowl of soup and a saucer of olive oil, I'd go for the other.
 There you have it! Bread in your slow-cooker. It does work!! This was actually the first time I'd pulled mine out in over a year. I really need to learn some new slow-cooker recipes. Anyone care to share your favorites??
I'm almost tempted not to post this. It completely undermines my attempts to convince you all to go buy a Dutch Oven. Okay, not completely, but it doesn't help!! Because the truth is, you can make fabulous bread in your slow-cooker. It's easy, quick(ish), delicious, and a great way to bake bread without turning on the oven!! I tried a few different batches to iron out some kinks, and give you lots of tips to make it work best. This is one of those times where I simply must say: Thank goodness for Pinterest!! I never would have dreamed this was possible without it.
Oh, and you also no longer have any excuse to be afraid of homemade bread, ever again. :)

Slow-Cooker Bread (from Artisan Bread in 5)
Printable Recipe
This is a half batch, enough for 2 small loaves
1 1/2 cups lukewarm water
1/2 Tb yeast
1/2-3/4 Tb kosher salt
3 1/4 cups flour
*They also have recipes for other breads that you can bake the same way*
Stir water, yeast, and salt together in a large bowl, or container with a lid. Dump in the flour and mix together into a wet, shaggy dough.


Sprinkle some flour over the top of the dough, and pull out about a 1 lb chunk (if you made a half batch, like me, it will just be half of the dough) Return the rest to the fridge.
Form a ball by tucking the sides in and under a few times, stretching the top surface of the dough ball. (They have a video of this technique here, it's important!)


Shared at Tutorials Tips and Tidbits and Foodie Friends Friday
October 23, 2012
Baked Salmon
Thank you for your encouraging responses to my new meal plan idea!! I hope everyone loves it!
This is one of those throw-together, use-what-you have recipes. It was inspired by my Aunt Lysa's salmon, but she puts hers on the grill. We don't have a grill big enough, so I put mine in the oven, and found the right timing and temperature from The Pioneer Woman. I also don't have exactly the seasonings Lysa uses, so I made it up with what I could find, including a recipe for homemade Garlic Bread seasoning that is fabulous. So many uses!! But we loved this salmon just as much as Aunt Lysa's. Even the boys!
 Baked Salmon
Printable Recipe
1 large salmon fillet, 1-2 pounds (we took the skin off, it's up to you!)
butter
Alaskan Salmon Seasoning (or any favorite fish seasoning)
lemon pepper (or fresh juice from 1 lemon)
Garlic Bread Seasoning (buy, or make your own! Recipe below)
Lay the salmon in the middle of a large piece of foil. Lay a few slices (about 1/2-1 Tb) of butter on the salmon. Sprinkle with all seasonings, and/or lemon juice.
Pull the sides of the foil up and crimp in the middle, making a sealed packet around the fish. Place the foil packet on a baking sheet, and place on the top rack in a COLD oven.
Turn the oven up to 400 degrees and set the timer for 20-25 minutes, depending on the size of your fish. Remove from oven and serve!
 I am VERY picky about fish. I hate it when it tastes strongly "fishy", which is why I don't cook with it much. But I'm learning!! And this was so quick and easy, it definitely calls for many repeats! We need some more Omega 3's around these parts.
 The fish was cooked perfectly, with so little effort! It was tender and flaky and delicious. The fun part is, you could do anything with it!! What do you have around the house?? Want to make it healthier, just skip the butter and drizzle a bit of olive oil! Fresh dill and lemon slices, Cajun blackened spices, rosemary and minced garlic... the possibilities are endless!
 I love easy meals, don't you??
Garlic Bread Seasoning (from Our Best Bites)
1/2 c. powdered Parmesan cheese
2 tsp. Kosher salt
2 Tbsp. garlic powder
2 tsp. oregano
2 tsp. basil
2 tsp. marjoram
2 tsp. parsley
This is one of those throw-together, use-what-you have recipes. It was inspired by my Aunt Lysa's salmon, but she puts hers on the grill. We don't have a grill big enough, so I put mine in the oven, and found the right timing and temperature from The Pioneer Woman. I also don't have exactly the seasonings Lysa uses, so I made it up with what I could find, including a recipe for homemade Garlic Bread seasoning that is fabulous. So many uses!! But we loved this salmon just as much as Aunt Lysa's. Even the boys!

Printable Recipe
1 large salmon fillet, 1-2 pounds (we took the skin off, it's up to you!)
butter
Alaskan Salmon Seasoning (or any favorite fish seasoning)
lemon pepper (or fresh juice from 1 lemon)
Garlic Bread Seasoning (buy, or make your own! Recipe below)
Lay the salmon in the middle of a large piece of foil. Lay a few slices (about 1/2-1 Tb) of butter on the salmon. Sprinkle with all seasonings, and/or lemon juice.
Pull the sides of the foil up and crimp in the middle, making a sealed packet around the fish. Place the foil packet on a baking sheet, and place on the top rack in a COLD oven.
Turn the oven up to 400 degrees and set the timer for 20-25 minutes, depending on the size of your fish. Remove from oven and serve!


Garlic Bread Seasoning (from Our Best Bites)
1/2 c. powdered Parmesan cheese
2 tsp. Kosher salt
2 Tbsp. garlic powder
2 tsp. oregano
2 tsp. basil
2 tsp. marjoram
2 tsp. parsley
October 22, 2012
Weekly Menu Oct. 22
You may have noticed that there is no rhyme or reason to what I post, and I post significantly more sweet treats than savory. Well, it's time for a change! And I am excited for this change. Stephen gets credit for the idea, though. Thank you, my love!
From now on, every Monday I will give you a menu for the week! A main dish, sides, bread/rolls, and dessert. As they are posted, I will link them back up to each menu post. There will still be plenty of sweet treats, because I have 2 extra days. And if I don't have a new side or bread to post, I'll post something breakfast-y! This way I can organize my recipes, you get a better variety, AND it takes all the stress out of deciding what to post every day. It will also force me to get creative and eat more vegetables. :) And spend as much time looking for real food as I do for sweet things... Always good!!

From now on, every Monday I will give you a menu for the week! A main dish, sides, bread/rolls, and dessert. As they are posted, I will link them back up to each menu post. There will still be plenty of sweet treats, because I have 2 extra days. And if I don't have a new side or bread to post, I'll post something breakfast-y! This way I can organize my recipes, you get a better variety, AND it takes all the stress out of deciding what to post every day. It will also force me to get creative and eat more vegetables. :) And spend as much time looking for real food as I do for sweet things... Always good!!
This week, we have:
Are you excited?? I am!!

Our Pumpkin Family Portrait
Also, I'd really like to give my Nibbles and Novels link party another try, the first of November. Anyone interested in co-hosting with me, to find a few more literary-minded friends? Please send me an email if you'd like to join! Thank you!
October 21, 2012
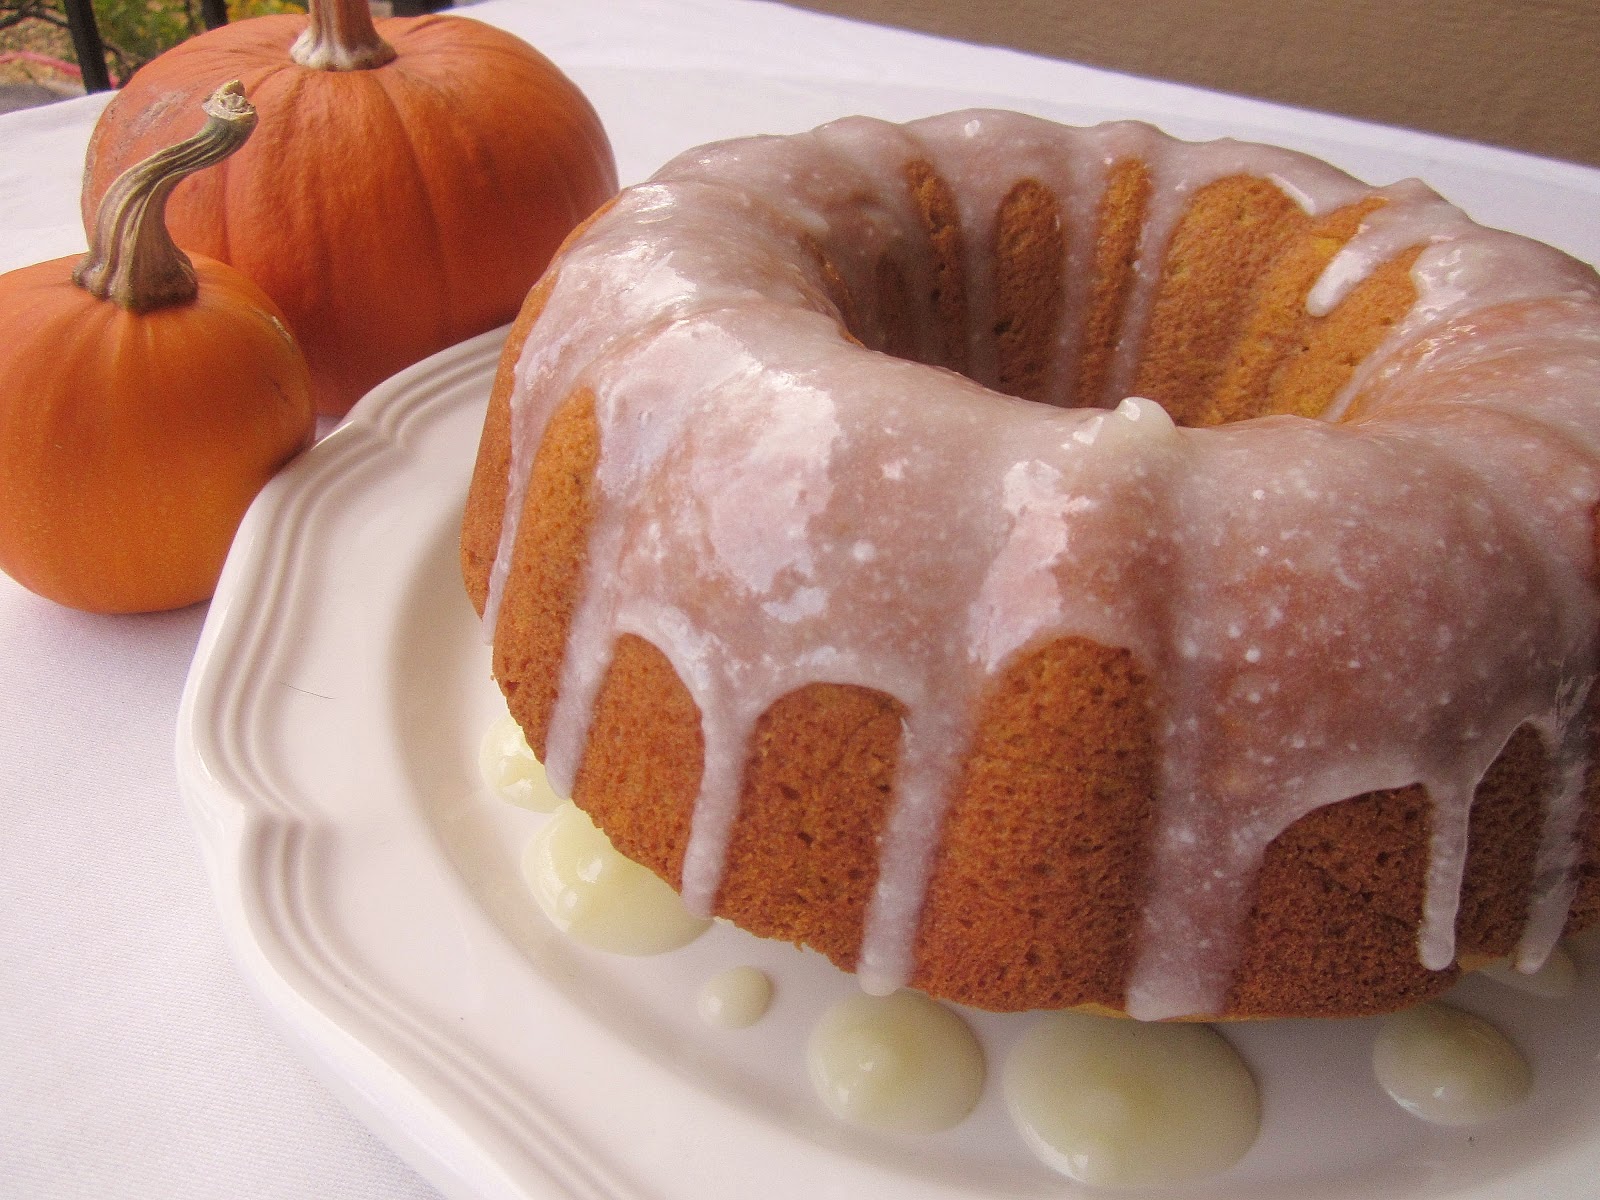
Pumpkin Buttermilk Cake and A Birthday!
Pumpkins and birthdays, a match made in heaven. We celebrated Joe's fifth birthday yesterday, because Stephen will be out of town for his real birthday. (on Tuesday) So for all intents and purposes, my baby boy is 5 years old! Who would have thought. Five years ago this stubborn, driven, over-achieving, adorable, snuggly little boy decided he was sick of that whole womb thing and showed up two whole months early, then stunned his family and doctors by being in perfect health and trying to escape his incubator box!! He's been on the move ever since, trying to be older, stonger, smarter, faster, and sweeter than any little boy has any right to be. I'm so thankful for my miracle boy.

And HE is so thankful for PUMPKINS!!

We started a tradition last year that every time we see pumpkins outside a grocery store (or anywhere, really!) the boys get to stop and hug them.

Joe has been asking for his Halloween pumpkin since the first of October, so for his birthday activity we went to pick our family pumpkins! We were going to go to a huge pumpkin patch with a corn maze, petting zoo, hayrides, etc. but both boys have come down with horrible sore throats (though they are cheerful and sound adorable) so we'll do that later. We just picked out pumpkins at a small patch a few blocks away. I'll post a pumpkin family portrait tomorrow. :)

Joe drew a face on each and every one of his balloons. He is currently trying to decide if he wants to be an artist or a superhero when he grows up.
He also asked for a pumpkin birthday cake, so I got a chance to bake my FIRST bundt cake!! Yay!!
Shared at On the Menu Monday
Printable Recipe
1 15-oz can pumpkin
¾ cup granulated sugar
1 cup packed dark brown sugar
½ cup butter (1 stick), softened
4 eggs, room temperature
2 tsp vanilla extract
3 cups all-purpose flour
1 Tb cinnamon
1 tsp ginger
1/2 tsp allspice
1/2 tsp cloves
1/2 tsp nutmeg
1 tsp. baking powder
½ tsp. baking soda
½ tsp. salt
¾ cup buttermilk
Glaze:
1/2 cup buttermilk
1/2 stick butter (1/4 cup)
1/2 tsp baking soda
1 tsp cornstarch
1/2 cup granulated sugar
1 Tb light corn syrup (or golden syrup, if you have it!!)
1 tsp vanilla

Preheat your oven to 350 degrees. Grease and flour/spray a 10-inch tube or bundt pan and set aside.
Drain the pumpkin by spreading over two layers of paper towels. Cover with two additional layers of paper towels and let stand for about 10 minutes. (I laid them over a cookie sheet to avoid getting juice on my counter!) Scrape the drained pumpkin into a bowl.
Combine flour, spices, baking powder, baking soda, and salt in a medium bowl. Whisk together and set aside.

Combine sugars and butter. Beat at medium speed until well-blended, about 3 minutes. Add the eggs, one at a time, beating well after each. Beat in the pumpkin and vanilla.
Add the flour mixture and buttermilk to the sugar mixture, alternating, beginning and ending with the flour.

Pour the batter into the prepared tube or bundt pan. Bake for 40 to 55 minutes or until a toothpick inserted comes out clean.
Cool cake in pan for 10 minutes on a wire rack. Remove cake from the pan and cool completely on wire rack.
For the glaze, combine all ingredients except vanilla in a LARGE saucepan. Heat over medium heat until it starts to bubble. Stir continuously while bubbling for 5 minutes. Remove from heat and stir in vanilla. Let cool mostly before drizzling over the cake

I LOVE bundt cakes. They're so effortlessly pretty!! Frosting cakes is hard. Drizzling bundts is easy as pie! Be careful with the glaze, if it boils too quickly, it curdles! Mine did a bit. But it was still yummy!! Sweet creamy vanilla with a hint of tang from the buttermilk... (Yours also won't be quite so white, I tweaked it)

This cake is deee-licious. It's soft, fluffy and buttery, and the flavors are lighter than I expected. Somehow the pumpkin tastes fresh-ish!!

I went a little crazy with the spices, but I'm glad I did. I love those classic pumpkin spices! They're my favorite part of Fall baking! They're so warm and homey. Yum.

Well, he may be picky about me baking fruit into things, but I sure am glad Joe picked such a winner for his cake! Happy Birthday JoJoBee! (Oh wait, I'm not supposed to call him that anymore. *hee hee*)

Subscribe to:
Posts
(
Atom
)